2D points 3D Objects 3D Points Boundary Cursor position Data for selected object Domain Expansion Field Field components Field formula Field tubes Function Generate expansions along 2D boundary Generate expansions for 3D objects Grid formula Grid transformation Info and movie directives Insert Integral Modify 2D expansions MMP Movie Open GL window PET basis PFD (predefined FD) Project Space, plane, arrow, or point Tools and draw Transformation data Window
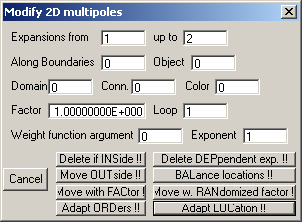
To open this dialog, press the Modify 2D … button in the Expansion dialog. The following picture shows the layout of the dialog.
Eight different procedures have been implemented that will be executed as soon as you press the corresponding button. Some of these procedures should only run after an MMP solution and error have been computed and the errors are placed in the function array. The BALance routine consists of three highly valuable subroutines that may improve the multipole locations and orders.
Remark: Each button contains a string with three capital letters that indicate the corresponding “ADApt EXPansion …” movie directive.
Before you press a button, you should make sure that the parameters in the various edit boxes are properly set.
The parameters in the boxes Expansions from, up to, Along Boundaries, Object, Domain, Conn., and Color specify which of the expansions shall be handled by the automatic procedures. These expansions are called “selected expansions” in the following. Note that only 2D multipole expansions will be affected, all other exapnsions are left unchanged. Since the last expansion is the excitation, this expansion is also left unchanged, even when it is a 2D multipole.
First of all, you may specify a sequence of expansions, starting with the expansion number defined in the Expansions from box and ending with the expansion number defined in the up to box. It is important to note that these numbers might change when some expansions are deleted by a routine.
For each multipole, the routines search for the nearest matching point on one of the 2D boundaries. When the corresponding boundary number does not coincide with the boundary number specified in the Along Boundaries box, the expansion will be ignored. As in other dialogs, the boundary number “0” stands for “all boundaries” and negative boundary numbers “-n” stand for “all boundaries from 1 upt to n”.
Since each multipole belongs to a 3D object, you define also the object number in the Object box. Expansions that do not belong to the selected object are ignored. Since the object number of an expansion (see Object # box in the Expansion dialog) may also be 0 or <0, Object 0 does NOT stand for “all objects”!
In the boxes Domain, Conn., and Color you define the domain number, the connection number, and the color number of the expansion. As for the boundary number, “0” stands for “all” and “-n” stands for “from 1 up to n”, where n is an integer number.
Most of the procedures need a real parameter that is defined in the “Factor” box. In addition to tha, some procedures require an integer parameter that is defined in the Exponent box. Moreover, several procedures are repeated N times in a loop. N is defined in the Loop box. Finally, some procedures take the information in the function array into account. For these routines, you must specify the argument number that contains the corresponding data in the Weight function argument box. When the value of the Weight function argument box is negative, for example, -M, several procedures run and plot where the 2D multipoles would be placed, but the position of the multipoles remains unchanged. This is useful for checking what would happen when the corresponding procedure would be executed with a positive value +M in the Weight function argument box. This is important because there is no undo feature. For this reason, it is strongly recommended to save the current set of expansions before running any of the following procedures.
When you press the Delete if INSide !! button, OpenMaXwell will delete the selected expansions that are inside the domain.
When you press the Delete DEPendent exp. !! button will compute the distance D of each of the selected expansions from the corresponding boundary. It will then consider all 2D multipole expansions with the same domain number within a distance D*Factor as dependent expansions and delete them. When Factor is considerably bigger than 1, it is very likely that all but one 2D multipoles will be deleted. Usually, it is a good idea to start with a relatively small Factor. When there are still many multipoles with a to short distance, one can increase the Factor and repeat the procedure. This procedure will be done automatically in a loop, when Loop > 1 is selected. In this case, the procedure starts with the distance D*Factor / Loop and ends with the tance D*Factor. When you select Loop < 1, nothing will be done.
Each multipole has a domain number, i.e., it is defined for a single domain. Because of the singularity of multipoles at their origin, multipoles should be placed strictly outside the corresponding domain. Multipoles placed inside a domain are usually misplaced. Instead of deleting them (Delete if INSide !!), it may be convenient to try to move them outside the domain. When you press the Move OUTside button, OpenMaXwell will detect those of the selected multipoles that are inside and move them to the position with the same distance from the boundary, but on the opposite side of the boundary. For complicated geometries it may happen that this “mirror” point is also inside the domain. In this case, the corresponding multipole should be deleted by running Delete if INSide !!.
Usually, 2D multipoles are distributed along a boundary. When the boundary is straight, it is often reasonable to place the multipoles at a constant distance from the boundary in such a way that the distances between neighbor multipoles is also constant. When one associates the nearest point Pk on the boundary to the k-th multipole at Ok, the points Pk, Ok, Ok+1, Pk+1 define a rectangle Rk. It then seems to be reasonable to place the multipoles in such a way that all associated rectangles Rk are identical or even identical squares. Such a “balanced” multipole set cannot be generated for curved boundaries, but one may try to obtain a multipole set in such a way that all Rk are close to squares. When a set of multipoles is given, one can find an “optimal” location for each multipole in the sense that the rectangles Rk-1 and Rk are as close to squares as possible. One may repeat this procedure several times by setting Loop >1 and hope that this improves the multipole set in such a way that more accurate solutions may be found. Although this works well in simple situations, when the given set of multipoles is already reasonable, the procedure may fail in more complicated situations. It may even happen that some multipoles are moved inside the domain. In order to avoid this, one can set the Factor. The less Factor is, the less each multipole will be moved in a single step. For example, instead of selecting Factor 1 and Loop 1, it is more save to select Factor 0.01 and Loop 100. Good results are usually obtained with Factor 0.1 and Loop 10. The balance locations subroutine is only called when Loop>0. While this subroutine is running, green lines between the multipoles considered are plotted while red lines indicate the direction of the movement.
When multipoles are placed along a boundary, one may associate an interval on the boundary to each multipole as follows: 1) Find the nearest boundary point Pk on the boundary and its distance Dk from the multipole k. 2) Starting at Pk, move along the boundary in negative direction until the point P1k with distance d from the multipole equal to Dk*1.4 is reached (1.4 is a factor that is reasonable according to experience). 3) Starting at Pk, move along the boundary in positive direction until the point P2k with distance d from the multipole equal to Dk*1.4 is reached. 4) The interval between P1k and P2k on the boundary is then associated to the multipole k. When "gaps" along the boundary are encountered, where no multipole is associated, one may obtain large errors in these gaps. When Loop<0 is set, the multipoles are moved in such a way that the gaps are reduced. As for balancing the multipole locations with Loop>0, this is done within a loop (that is executed -Loop times) and the strength of the moves are controlled by Factor.Good results are usually obtained with Factor 0.1 and Loop -10. While this subroutine is running, colored lines from each multipole to points along the boundary, associated with the multipole are plotted. From this, one can observe how the gaps are reduced.
When Loop=0 is set, the orders of the multipoles are balanced by checking the portions of the boundary near each multipole. Multipoles with large ratio "associated boundary / distance from boundary" obtain higher maximum orders. While this subroutine is running, colored lines from each multipole to points along the boundary, associated with the multipole are plotted, as for Loop<0.
For safety reasons, you can use this routine only for a single boundary, specified in the Along Boundaries box.
It is reasonable to run this routine three, first with Loop>0, then with Loop<0, and finally with Loop=0.
Although a balanced 2D multipole distribution with (almost) square shape of the Rk is reasonable, one may obtain more accurate results by moving the multipoles of such a balanced set further away from the boundary. The further away the multipoles are, the higher (worse) the condition number of the MMP matrix. As long as the MMP matrix solver does not encounter numerical problems because of the matrix condition, it is likely that one observes more accurate results when one moves the multipoles away from the boundary. When you press the Move with FACtor !! button, OpenMaXwell will move all selected multipoles to a new position as follows: For each multipole (at Ok), the nearest point Pk on the 2D boundary is searched and the distance Dk is evaluated. The multipole is moved to the position Qk along the line from Pk to Ok in such a way that the new distance is Dk*Factor. When Factor is too big or negative or when you let OpenMaXwell repeat this procedure too many times by a too high value in the Loop box, it may happen that the multipole is moved inside the domain, which should be avoided. For this reason, try first what would happen without making the move effective by selecting a negative number in the Weight function argument box.
Press the Move w. RANdomized factor !! button to let MaX- move the selected 2D multipoles at a randomized position. The new position will be in a distance D=Factor*Random*Dnear, where Random is a random number (0<Random<1) and Dnear is the distance of the multipole from the boundary. The procedure is repeated Loop times. The new positions are only effective when Weight function argument is positive.
Once you have obtained reasonable results with a given set of 2D multipoles, you may try to improve the results by increasing the maximum orders of those multipoles that are close to the area of the boundary where the MMP errors are high. For doing this, let MMP compute the errors (Errors!! button in the MMP dialog) and save them on a function file (Write errors… button in the MMP dialog). Then, let OpenMaXwell read the function file into the function array (Read… button in the Function dialog). After this, the first column (argument number 1) of the function array will contain the absolute error in all matching points along the boundary. Therefore, you specify Weight function argument 1 (or –1 for checking without moving), select a Factor (usually < 1) and press the Adapt ORDers !! button. Note that the number of Loops to be performed, is always 1 for this routine.
OpenMaXwell will proceed as follows: It first computes a “force field”. The values stored in the Weight function argument column of the function array are considered as the “sources” of this “force field” and the value in the Exponent box determines how rapidly the “force field” decays with the distance from the “source”. OpenMaXwell than computes the “forces” for the selected multipoles and the average of these forces. It adapts the maximum orders of each multipole in such a way that “new order” = ”old order” * |Factor| * ”force” / ”avarage force” holds (approximately), i.e., it will reduce the maximum orders of those multipoles with “small error forces” and increase the maximum orders of those multipoles with “big error forces” – provided that the absolute value of Factor is >1. If Factor is positive, OpenMaXwell will only increase the maximum orders. Otherwise, it will also decrease them (for those multipoles with “small error forces”).
Instead of using the error information of a previous MMP computation for adapting the maximum orders of the multipoles, you may also use this information for moving the multipoles closer to the area of the boundary with high errors. The procedure is essentially the same as for the adaption of the orders. OpenMaXwell will compute a “force field” and use it for moving the selected multipoles. In this case, the distance of the new location from the old location depends on the “force” and on Factor. Since big factors move the multipoles far away, try small factors (0.1 … 0.5) first. Note that this procedure is repeated Loop times. The new positions are only effective when Weight function argument is positive. Instead of moving multipoles toward those areas of the boundary, where the absolute errors (function argument 1) are large, you may also move them toward those areas where the field (function argument 2) is large or where the relative errors are large (function argument 3). Note that it is not guaranteed that the new set of multipoles will reduce the errors of the computation. Adapting multipoles requires some experience and depends much on the details of the problem to be solved.
Press the Cancel button to close the dialog.
Responsible for this web page: Ch. Hafner, Computational Optics Group, IEF, ETH, 8092 Zurich, Switzerland
Last update
17.02.2014