2D points 3D Objects 3D Points Boundary Cursor position Data for selected object Domain Expansion Field Field components Field formula Field tubes Function Generate expansions along 2D boundary Generate expansions for 3D objects Grid formula Grid transformation Info and movie directives Insert Integral Modify 2D expansions MMP Movie Open GL window PET basis PFD (predefined FD) Project Space, plane, arrow, or point Tools and draw Transformation data Window
Press the field button
![]() or
select Field... from the Tools menu to
open this dialog.
or
select Field... from the Tools menu to
open this dialog.
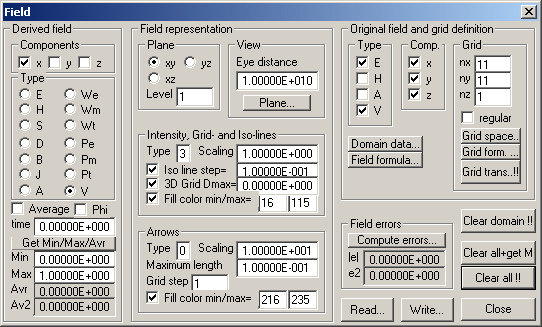
The Field dialog contains several groups of boxes and buttons that allow you to define the 1) original field to be evaluated, 2) the grid of the original field, 3) field and grid definition formula, 4) field and grid transforms, 5) the components and type of the derived field to be displayed, 6) various field representations, etc.
OpenMaXwell works with two types of fields: the original field and the derived field. The original field is complex if the problem is time-harmonic (see Project dialog). Otherwise, it is real valued.
OpenMaXwell works with the three vector fields E, H, A and the scalar field V. You may turn each of them on or off in the Type group, according to your requirements
Moreover, you can turn off one or two of the Cartesian components x, y, z of the original field in the Comp. Group. Note that the scalar field V is considered a vector field with an x component only. Therefore, the x component should always be on when you work with this field.
The original field is evaluated according to the settings in the Field formula dialog. This dialog pops up when you press the Field formula… button.
Since the field evaluation depends on the material properties of the different domains, there is a Domain data… button, which causes the Domain dialog to pop up.
The original field is computed on a grid with nx times ny times nz grid lines. You can specify these numbers in the corresponding boxes of the Grid group.
The grid can be regular or irregular. Check the corresponding box when you want to work on a regular grid. Note that regular grids are easier to deal with and require less information to be stored because the location of each grid point can be evaluated from four 3D vectors that define the space occupied by the grid. Press the Grid space… button to inspect or modify this space.
For working on an irregular grid, the Cartesian coordinates of every grid point must be defined. Since manual definitions are extremely tedious, OpenMaXwell allows you to define irregular grids using formulae. When you press the Grid form. … button, the Grid formula dialog pops up and you can inspect or modify the corresponding data. Note that the default grid formula defines a regular grid.
OpenMaXwell can apply transformations to any irregular grid. Note that regular grids cannot be transformed because the information of the locations of all grid points - which is required for grid transformations - is not stored for regular grids. The grid transformations are defined by formula. When you press the Grid trans…!! button, the Grid transformation dialog pops up. This dialog allows you to inspect and modify the corresponding data and to start transforming the grid. Note that the exclamation marks on this button indicate that the Field dialog will be closed as soon as you press the button.
When you change the data defining the original field and the corresponding grid, OpenMaXwell must run several processes that can be time consuming. To make the changes effective, press the Clear all!! Button. OpenMaXwell will free and reallocate memory for storing the original field and grid data. Moreover, it will compute the domain numbers and the field values in each grid point. The domain numbers are computed from the current boundaries and the field values from the current settings in the Field formula dialog. Note that the exclamation marks on this button indicate that the Field dialog will be closed as soon as you press the button.
Especially on fast computers, the field on a small grid may be computed very quickly. In this case you might prefer that OpenMaXwell computes the field without closing the Field dialog. Moreover, you usually press the Get Min/Max/Avr button afterwards for obtaining some statistics on the field. When you press the Clear all+get M button, OpenMaXwell will do the same as when you press the Clear all!! button, open the Field dialog again and press the Min/Max/Avr button. Note that you cannot stop the field computation with the Stop button when you have pressed the Clear all+get M button.
When you transform the grid or change the boundaries, this may invalidate the domain numbers of some of the grid points. When you press the Clear domain!! Button, OpenMaXwell recomputes the domain numbers. Note that the exclamation marks on this button indicate that the Field dialog will be closed as soon as you press the button.
OpenMaXwell does not directly display the original field, because the original field often contains too much data per field point for a reasonable graphic representation. Instead, a simpler derived field is computed first. This field is always real valued and has no more than three components.
If the derived field is a vector field, you can turn one or two of its components off in the Components group when you want to further reduce the information to be displayed. Scalar fields are simply vector fields with an x component only. Therefore, do not turn off this component, when you want to view a scalar field.
OpenMaXwell can derive the following types of fields: The vector fields E (electric field density), H (magnetic field density), S (Poynting vector field), D (electric displacement), B (magnetic induction), J (electric current density), A (vector potential) and the scalar fields We (electric energy density), Wm (magnetic energy density), Wt (total energy density), Pe (electric loss density), Pm (magnetic loss density), Pt (total loss density), V (scalar potential). Select the field type of the derived field in the Type group.
When the original field is complex, i.e., when the problem is time-harmonic, OpenMaXwell can compute the time average of this field, its phase, or its value at a certain time to obtain a real valued field. Use the Average and the Phi check boxes and the time box for defining what you want to display.
To obtain a good representation of the derived field, it is useful to have some statistics. OpenMaXwell computes the minimum and maximum value of the derived field as well as the average and the square average of it as soon as you press the Get Min/Max/Avr button. The corresponding data is displayed in the corresponding boxes below this button.
The values specified in the Min and Max box are also used when the field is displayed. These values are associated with the fill colors and iso lines to be drawn. When you manually change the Min and Max values, these settings become effective when OpenMaXwell evaluates iso lines and fill colors. Areas where the field is above the value in the Max box will be represented by the maximum color (white by default) and areas where the field is below the value in the Min box will be represented by the minimum color (black by default).
OpenMaXwell can display any derived field in a graphic window using perspective projection on an arbitrary plane.
In general, the field is defined on a 3D grid with nx times ny times nz grid points. The projection of the entire field information on a 2D plane is neither useful nor attractive. It is more reasonable to draw the field defined on a 2D grid only, i.e., to use a 2D section of the 3D grid. When the 3D grid is regular and oriented in the x, y, z directions, this means that the field in only one of the three planes xy, xz, yz is drawn on a level that is perpendicular to this plane. The plane and level can be selected in the plane group. For example, when you have nx=ny=nz=11 and select yz plane level 3, OpenMaXwell will draw all grid points with index ix=nx, iy=1…ny, iz=1…nz. For irregular grids, the planes become curved surfaces, but the procedure remains the same.
The default grid is 2D with nx=ny=11 and nz=1. OpenMaXwell handles this exactly as a 3D grid. When you select yz plane level 3, OpenMaXwell will draw all grid points with index ix=nx, iy=1…ny, iz=1…nz. Since nz is equal to one, it will draw the field along a grid line. In order to obtain a representation of the field on the entire 2D grid, you must select the xy plane level 1 in this case.
The data required for the perspective projection of the field on a plane in space is defined in the View group that contains the Eye distance box and the Plane… button. Press this button to inspect and modify the data defining the plane. The Plane dialog will pop up. This dialog contains the Cartesian coordinates of the origin of the plane, its two tangent vectors, i.e., the X and Y directions, and its normal vector, i.e., the Z direction.
The X, Y, Z directions of the view plane should be unit vectors that are perpendicular to each other. Since it is difficult to enter an orthonormal set of vectors, you can enter arbitrary vectors. When you press the OK button of the Plane dialog, OpenMaXwell will ask you if you want the vectors to become orthonormal. Answer this question in the affirmative. OpenMaXwell will first compute a unit vector parallel to the X direction and it will replace the X vector by this unit vector. From a vector product of the X and Y vectors it will compute a unit vector perpendicular to the XY plane and replace the Z vector by this one. This means that the data you may have entered in the Z direction boxes is ignored. Finally, the Y vector is obtained from the cross product of the Z and X vectors. The resulting plane will be identical with the plane defined by the X and Y directions you have specified, provided that X and Y vectors were neither parallel to each other nor zero. The X direction will be parallel to the X direction you have specified, provided that it was non-zero.
For perspective projections, you must specify the location of the eye relative to where you want to view the field. This point is a distance from the view plane (in Z direction) that can be specified in the Eye distance box.
Parallel projection is a special case of perspective projection with the eye at an infinite distance from the view plane. When you select a very large Eye distance, there will be no visible difference between parallel and perspective projection.
Intensity plots give an excellent overview of scalar fields. OpenMaXwell can also display intensity plots of vector fields. The associated scalar intensity is equal to the length of the vector.
You can specify three types of intensity plots in the Type box of the Intensity, Grid- and Iso-lines group. If you specify Type 0, the drawing is suppressed. Type 1 is quick and dirty. At each grid point, OpenMaXwell will simply draw a square, filled with a color that indicates the field strength in this point. Type 2 will draw quadrangles defined by four neighboring grid points and filled with a color that indicates the average field strength in these points. This is still simple, but it makes the grid lines visible. Type 3 is more sophisticated, OpenMaXwell will take the quadrangles of Type 2, compute iso-lines in each quadrangle, and fill the space between the iso-lines with a color that indicates the average field strength in this area.
Especially when you work with irregular 3D grids or when you use the 3D grid representation (see below), you will notice that the hiding of parts of the grid behind the parts of the grid in front is not always correct. OpenMaXwell has an improved hiding feature, to turn this on, select negative intensity type numbers. Type -3 is equal to Type 3 with improved hiding. Note that more memory is required for the improved hiding. When not enough memory is available, it is turned off automatically.
OpenMaXwell works in 256 color mode. 20 of these colors are reserved by Windows. The palette of the remaining colors with the numbers 0 up to 235 can be set by the user. OpenMaXwell reserves the colors 0-15 for standard colors like black, white, red, green, blue, etc. The colors 16-115 are usually used for the intensity representation. By default, 16 is black, 115 white and the colors in between cover the spectrum from black to dark blue, red, yellow to white. The colors 116-215 are complementary to the colors 16-115 and the colors 216-235 are on a gray scale.
The field strengths in the Min and Max boxes of the Derived field group are mapped to the color numbers defined in the Fill color min/max boxes. The color numbers in between are then used to represent the field strengths proportionally. Field strengths below the Min value are represented by the minimum color. Field strengths above the Max value are represented by the maximum color.
When you have selected Type 2 or 3 and the grid line box is checked, OpenMaXwell will draw the grid lines.
When the grid is regular, the intensity plots are within a plane and all grid lines are straight lines. OpenMaXwell can virtually move each grid point with a vector perpendicular to the plane and with a length proportional to the field strength. This gives nice 3D landscape representations of the field, provided that the view plane and the grid plane are not identical. Note that these planes are identical by default. Thus, you should first rotate the view plane. The maximum length of the vector used for the grid point displacement is selected in the 3D Grid Dmax= box.
When you have selected Type 3 and the Iso line box is checked, OpenMaXwell will draw iso-lines. The value of the first iso-line is equal to Min and the value of the last iso-line is equal to or smaller than Max. A linear spacing is used, when the corresponding value defined in the Iso line step= box is bigger than zero. Otherwise, logarithmic spacing is used and the ratio of the values of neighboring iso-lines will be equal to the absolute value defined in this box. Note that a logarithmic scale requires Min and Max to be strictly positive. The current OpenGL graphics implementation does not support logarithmic scale!
You can change the scaling of the intensity plots and iso-lines by modifying the scaling factor in the Scaling box. Note that this does not affect the 3D grid representation.
If the derived field is a vector field, you might wish to view the directions of these vectors at the grid points. The corresponding data is set in the Arrows group. As with the intensity representation, there are three types of arrows. If you select Type 0, the arrows are suppressed. Type 1 is a quick and dirty representation with needles, i.e., straight line of a length proportional to the field strength Type 2 uses triangles pointing in the direction of the arrow. The base line of the triangle indicates the strength of the vector component perpendicular to the window plane. Moreover, the triangle is filled with a color that indicates the field strength when the corresponding box is checked. Type 3 is an arrow representation similar to Type 2 but slightly more complicated. Again, the base line of the arrow represents the strength of the vector component perpendicular to the window plane.
All vector representations draw graphic objects with a size proportional to the strength of the vector. This size is limited by the value set in the Maximum length box.
If you are interested in the direction of the vectors more than their magnitude you can increase the Scaling factor in the corresponding box. This avoids having very small vectors which are difficult to see in areas where the field is weak.
A high density of grid lines is desired for obtaining smooth iso-lines and intensity representations. However, vector arrow representations can look cluttered and messy when you have a high density of grid lines. To avoid this problem you can draw arrows only on every n-th grid line. This is set this in the Grid step box.
The fill colors used for the Type 2 and 3 arrow representations and the corresponding mapping is identical to the mapping of the fill colors for the intensity representation (see above).
OpenMaXwell allows you to compare solutions of a problem obtained by different methods or models. Assume that you have computed the exact field and that you have stored the corresponding data in the file EXACT.FLD. When you want to compute the errors of the current solution, press Compute errors…. A file name dialog pops up, where you can select EXACT.FLD. OpenMaXwell will read the original field contained in this file and compute the differences with the current original field. It will overwrite the original field by this difference field and compute the average of its absolute values as well as the square root of the average of its square values. These results are displayed in the |e| and in the e2 box of the Field errors group. Note that the type, components, and grids of the original field and the field stored in EXACT.FLD should be identical, otherwise the comparison is of no use. Note that the differences of the two solutions can be viewed graphically. If you want to proceed with the current field after studying the errors, don’t forget to save the current field data to a file (see below) before you press Compute errors….
Press the Read… button to read field data from a file. Since a field file can contain the field representation data defined in this dialog and/or the values of the original field and the corresponding grid information, OpenMaXwell will ask you first, what portion of data you want to read. Moreover, OpenMaXwell can simply overwrite the original field by the field in the file or it can compute the differences between the current field and the field on the file. It will ask you, what you prefer. Afterwards, a file name dialog will allow you to select any file name.
Notes for computing differences of fields:
The current field is overwritten by the difference field.
The numbers of grid lines of both fields must be identical.
When you subtract derived fields, make sure that the fields are of the same type. A derived field consists of a real 3D vector and a scalar that is equal to the absolute value of the vector. When only one component of the vector is turned on in the Field dialog, the scalar is equal to the vector component that is turned on. In this case, the scalar may be negative. For non-relative, derived fields, the differences of the vector components and of the scalar are evaluated. In this case, the scalar may be different from the absolute value of the difference of the vectors! For relative, derived fields, the differences of the vectors are computed and divided by the scalar of the field contained in the file. Afterwards, the scalar is computed from the resulting "relative difference" vector, i.e., in this case, the scalar is not the relative difference of the scalars.
Press the Write… button to write field data to a file. Since a field file can contain the field representation data defined in this dialog and/or the values of the original field and the corresponding grid information, OpenMaXwell will first ask you, what portion of data you want to save. Afterwards, a file name dialog will allow you to select the file name to save to. You may also store the derived field data on the file. Since the computation of the derived field is quick and derived field data my cause large files, you usually should not store derived field data on a file.
Press the Close button to close the dialog. On closure the derived field will be computed using the last values specified in the dialog. This can be time consuming if the number of grid points is large.
Responsible for this web page: Ch. Hafner, Computational Optics Group, IEF, ETH, 8092 Zurich, Switzerland
Last update
17.02.2014